Updated September 2, 2026. The correct distance between a projector and screen is determined primarily by the projector’s throw ratio and the width of the projected image—not by one universal “10 to 12 feet” rule. For most projectors, the planning formula is:
Projector-to-screen distance ≈ image width × throw ratio.
Brandligo has not independently measured every projector discussed in this guide. Use the exact manufacturer manual or throw-distance calculator for your model before drilling, mounting, purchasing a fixed screen, or committing to cabinetry. Zoom position, lens design, aspect ratio, installation tolerances and the manufacturer’s measurement convention can change the final placement.
Quick answer: how far should a projector be from the screen?
There is no single distance that works for every projector. A projector with a 1.2 throw ratio needs roughly 1.2 times the image width between its lens and the screen. A short-throw model with a 0.6 ratio needs only about 0.6 times the image width. Ultra-short-throw projectors can sit much closer, but their placement should be taken directly from the manufacturer’s installation table because chassis depth, lens position and screen geometry matter.
If you are choosing the screen size based on where people sit, that is a different calculation. Use our Projector Screen Size Guide for viewing-angle and seating-distance planning. This page is specifically about the distance from the projector lens to the screen.
The throw-ratio formula
Throw ratio describes the relationship between projection distance and image width:
Throw ratio = projection distance ÷ image width
Rearranging that relationship gives the placement formula:
Projection distance = image width × throw ratio
This is important because projector screens are usually marketed by diagonal size, while throw-ratio math uses image width. A 100-inch 16:9 image is about 87.2 inches wide. A 120-inch 16:9 image is about 104.6 inches wide.
| 16:9 diagonal | Approx. image width | Distance at 0.6 throw ratio | Distance at 1.2 throw ratio | Distance at 1.5 throw ratio |
|---|---|---|---|---|
| 100 in | 87.2 in / 7.27 ft | 4.36 ft | 8.72 ft | 10.9 ft |
| 120 in | 104.6 in / 8.72 ft | 5.23 ft | 10.46 ft | 13.08 ft |
| 150 in | 130.7 in / 10.89 ft | 6.53 ft | 13.07 ft | 16.34 ft |
These are planning examples, not installation specifications for a particular projector. BenQ’s current throw-ratio guidance defines throw ratio as projection distance divided by image width and notes that throw distance is measured from the projector lens to the screen surface. A zoom projector may publish a range rather than one fixed ratio, so the same screen size can have more than one valid lens position. BenQ throw-ratio guidance.
If your room depth is fixed, calculate the throw ratio you need
If the screen size and mounting position are already fixed, reverse the formula: required throw ratio = available lens-to-screen distance ÷ image width. For example, a 100-inch 16:9 image is about 7.27 feet wide. If the lens can sit 10 feet from the screen, you need a throw ratio of about 1.38. Then choose a projector whose published throw-ratio range includes that value, and confirm the result with the manufacturer’s calculator or installation manual.
This is especially useful in conference rooms, classrooms and existing home theaters where ceiling mounts, furniture or cable runs limit projector placement. For office and shared-room purchasing, use Brandligo’s business projector procurement guide to compare brightness, resolution, maintenance, connectivity and deployment fit after confirming the throw geometry. Lens shift can help move the image vertically or horizontally on compatible models, but it does not replace choosing a lens and throw ratio that can create the required image size from the available distance.
What if the projector has a throw-ratio range?
Many standard-throw projectors have optical zoom and therefore publish a range such as 1.15–1.50 rather than one fixed ratio. Calculate both ends:
- Minimum distance ≈ image width × minimum throw ratio
- Maximum distance ≈ image width × maximum throw ratio
That gives you the practical lens-to-screen placement window. Within that range, optical zoom can help fit the image without moving the projector. If the image is still too large for the screen, see our guide to making a projector image smaller before relying on heavy digital resizing. Do not confuse optical zoom with digital resizing or keystone correction; those tools can be useful for setup, but they should not replace choosing a physically compatible mounting position.
Standard throw, short throw and ultra short throw
The category name is less important than the exact published throw ratio, because manufacturers do not all use category labels identically. In practical terms, a lower throw ratio creates a larger image from a shorter distance. If your room is shallow, compare the exact ratios and manufacturer placement tables before buying.
Our Short Throw vs UST vs Long Throw Projectors guide explains the trade-offs among these designs. Ultra-short-throw placement is especially sensitive: a small movement can materially change image geometry, and UST screen compatibility differs from conventional standard-throw ALR screen design.
Why the old “100-inch screen = 10–12 feet” rule is unreliable
A 100-inch 16:9 screen is about 7.27 feet wide. At a 1.5 throw ratio, a reasonable planning distance is about 10.9 feet. But at a 1.2 ratio it is about 8.7 feet, and at 0.6 it is about 4.4 feet. The screen size alone therefore cannot determine projector placement.
This is why Brandligo no longer recommends a universal projector distance. Start with the exact model, screen aspect ratio and intended image size, then calculate the lens-to-screen range.
Projector distance vs seating distance
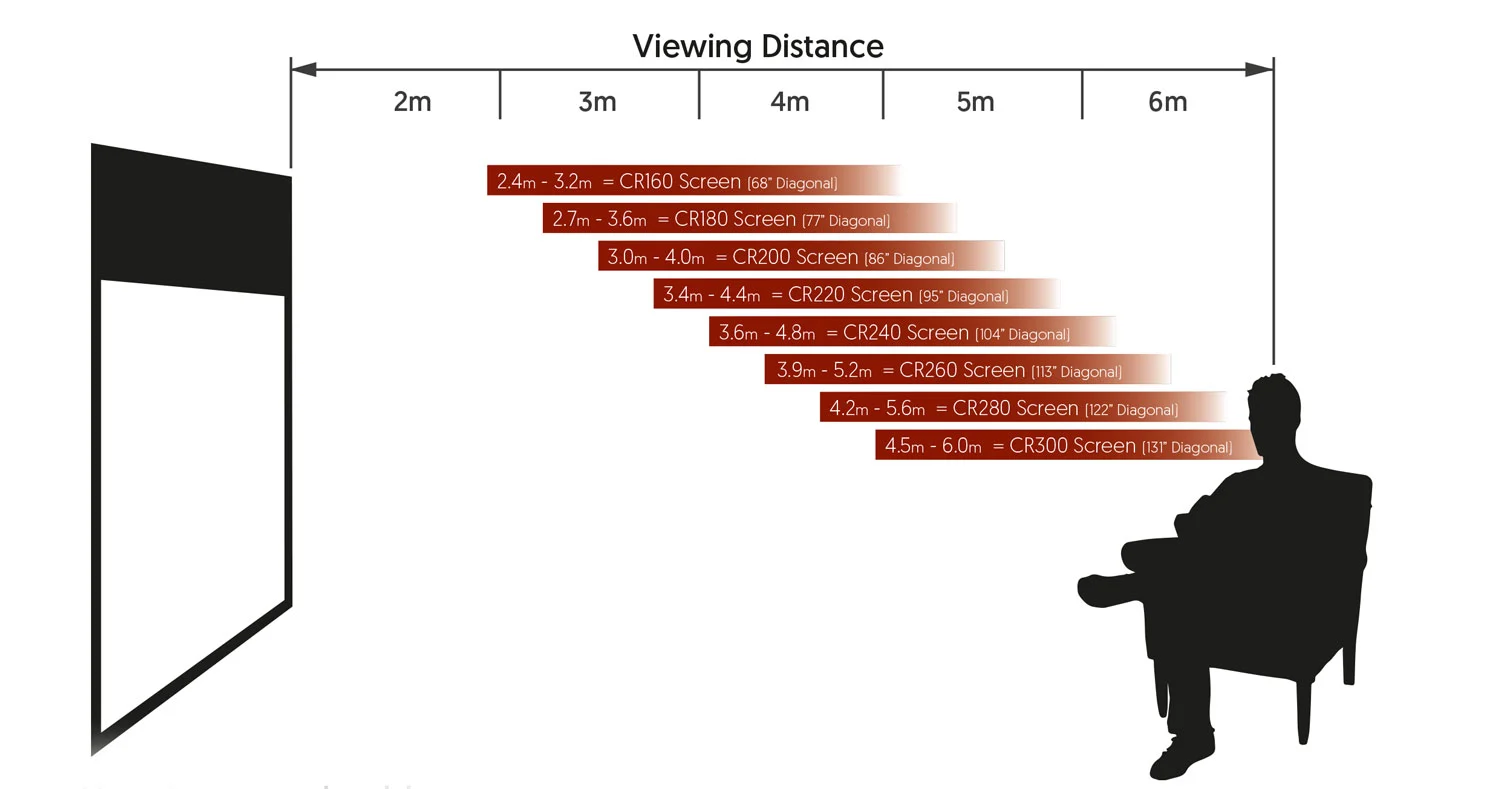
These are separate decisions. Projector throw distance determines whether the projector can physically create the desired image size. Viewing distance determines how large that image feels to the audience. A projector can technically produce a 120-inch image in a room where that screen is uncomfortable for the seating position—or the reverse.
Plan the screen and seating first with the screen-size guide, then confirm that the chosen projector’s throw range fits the room.
Ceiling mounting: measure before you drill
For a ceiling installation, determine the required lens-to-screen distance before choosing the mount position. Also verify vertical offset, lens shift, ventilation clearance, mount orientation and cable routing in the manufacturer manual. A projector being “far enough away” does not mean its image will automatically land at the correct height.
For installation planning, see How to Ceiling Mount a Projector in 2026. That guide covers mounting and clearance; this guide covers throw distance.
Does moving the projector farther away make the image dimmer?
The simple answer is that image brightness at the screen depends on more than distance alone. Moving a projector farther away often goes together with changing zoom position or producing a larger image, and a larger illuminated area reduces luminance. Lens transmission, zoom position, picture mode, screen gain, ambient light and the projector’s actual output all matter. Do not choose throw distance as a substitute for proper brightness planning.
If ambient light is the problem, use our Best Projector for Bright Rooms guide rather than simply moving a projector closer and assuming the issue is solved.
A practical placement workflow
- Choose the target screen size and aspect ratio.
- Convert the diagonal screen size to image width.
- Find the exact projector model’s manufacturer-published throw ratio or distance table.
- Multiply image width by the minimum and maximum throw ratios if a zoom range is provided.
- Confirm where the manufacturer measures throw distance from—normally the lens, but follow the model documentation.
- Check vertical offset, lens shift and mounting clearance separately.
- Confirm the projector can produce the target screen size within its supported range.
- Dry-fit or temporarily position the projector before drilling permanent mounting points.
FAQ
How far should a projector be from a 100-inch screen?
It depends on throw ratio. A 100-inch 16:9 image is approximately 87.2 inches wide. At a 1.2 throw ratio, the calculated distance is about 104.6 inches, or 8.7 feet. At 1.5, it is about 130.8 inches, or 10.9 feet. Use the exact model’s published range before installation.
How far should a projector be from a 120-inch screen?
A 120-inch 16:9 image is approximately 104.6 inches wide. At a 1.2 throw ratio, the calculated lens-to-screen distance is about 125.5 inches, or 10.5 feet. At 1.5, it is about 156.9 inches, or 13.1 feet.
Can I place a projector closer than its specified minimum distance?
Do not assume so. If you move outside the manufacturer’s supported throw range, the projector may not focus correctly or fill the intended screen. Choose a projector with a shorter throw ratio if your room cannot accommodate the required distance.
Should I use keystone correction to solve a distance problem?
No. Keystone correction helps correct trapezoidal geometry when projector and screen alignment are imperfect; it does not change the physical lens-to-screen throw requirement in the same way as choosing the correct lens, throw ratio or optical zoom position.
Bottom line
The best projector-to-screen distance is not a generic number. Use image width × throw ratio, calculate the full zoom range when one is provided, and then confirm the result against the exact manufacturer manual or calculator. Keep projector throw distance separate from viewer seating distance, and verify mounting height, lens shift and clearance before permanent installation.


Leave a Reply